Pick Requests & Returns
- 7 Minutes to read
- PDF
Pick Requests & Returns
- 7 Minutes to read
- PDF
Article summary
Did you find this summary helpful?
Thank you for your feedback
Pick Requests & Returns
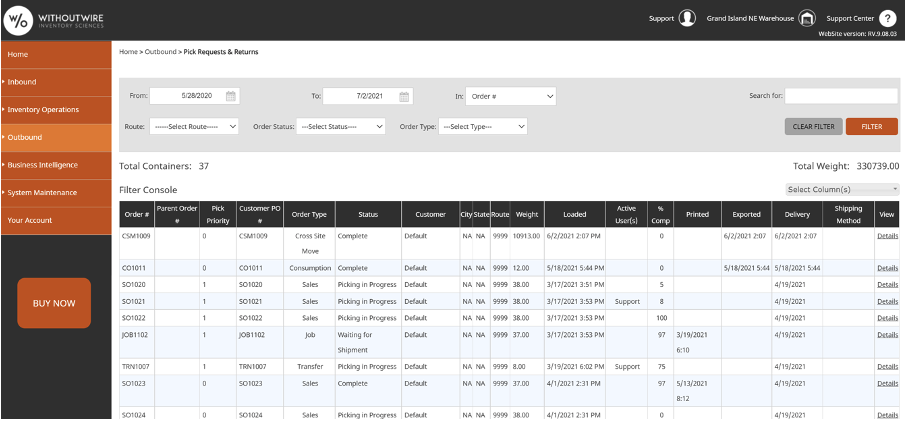
The Pick Requests & Returns page is the control center for the picking process. It allows users to manage all order types (i.e., sales, transfers, jobs, manufacturing picks, etc.). After new pick requests are brought in either from the ERP systems, API calls, or CSV import/export, a user can see that orders and other pick requests are imported correctly by examining the Pick Requests & Returns page. This page will also show Cross-Site Moves and Consumption records.
Information Available
The outbound console allows a user to see many pieces of information related to pick requests. Below is a list of attributes that can be seen, as well as a brief description of each.
Order Number
The Unique Number (can include digits and text) used as identification for sales orders or pick requests.
Parent Order Number
If an order is waved together with other orders, this column will notate the Waveset that was used to batch pick the child order.
Pick Priority
Notes the priority in which this order should be picked. This is a visual indicator to help identify orders for assignment to pickers.
Customer PO Number
The PO number the customer will use when they request a sales order/pick request. This number can also be used for other reference numbers such as field service jobs or ASN imports.
Order Type
The type of pick request that will be picked. Example: Sales; Transfer; Return; Credit.
Status
The status is used to determine if the sales order has been completed yet. See pick request status below.
Customer Name
The customer name, field tech, or warehouse associated with the pick request.
City Name
Represents the “Ship To” City.
State Name
Represents the “Ship To” State.
Route
The Route number that is assigned to the pick request.
Weight
The total weight of the expected product on the pick request.
Loaded Date
The date the pick request was loaded into the WithoutWire system.
Active User(s)
This displays who is currently picking to the order, if it is in progress.
Percent Complete
The percentage of product on the pick request that has been picked so far.
Printed
The date/time that the pick request final documents were printed.
Exported
The date/time the pick request was exported back to the ERP or exported via API or CSV.
Delivery
The expected delivery date of the pick request to the customer, manufacturing location, field tech, or warehouse site.
Shipping Method
Indicates which method will be used when shipping (Same Day, Overnight, Freight, etc.)
Details
This is a link that takes you to a separate page for each pick request. It has a list of the line items and their quantities. See pick request details below.
Pick Request Status
Each sales order/pick request is given a status field to allow progress on an order to be tracked. When a pick request is imported, it is assigned a status of “Unassigned.” If Auto Assign Orders is configured, then the picks will be assigned to users automatically, and the status of the pick request will be set to “Waiting to be Picked.”
Below is a list of the pick request statuses, and what they are used for.
Unprocessed
Cubing, route planning, or containerization (if applicable) has not taken place.
Needs Review
This order is a child order that is pending Waveset pick completion.
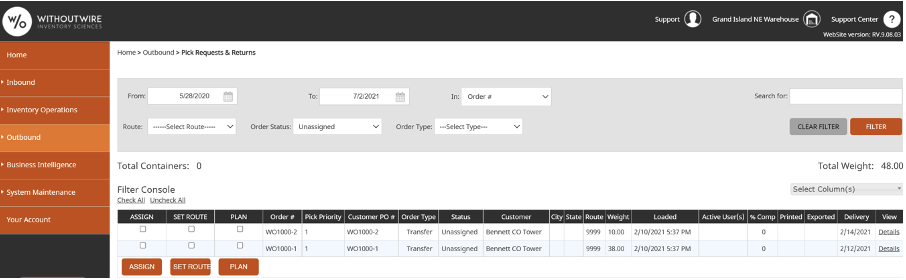
Unassigned
This state is the only state that allows picks to be assigned to users. This state will be bypassed if Auto Assign Orders is on.
Waiting to be Picked
Order is on a user's device but is not actively being picked.
Picking in Progress
Once a user opens a pick request on the handheld and begins to pick product, the pick request will change to this status. If the user makes no changes to the pick request, the status will not be changed and should be put back to Waiting to be Picked.
Waiting for Export
Order has been completed in WithoutWire and is pending export to an external system.
Waiting for Shipment
Once a pick request is picked to completion (could be shorted as well) and staged on the handheld, the pick request will change to this status.
Exporting
Typically used for ERP integration to indicate that the pick request is in the process of updating ERP transactional records.
Complete
The pick request is completed.
Processing
The pick request is being processed for cubing, route planning, or containerization (if applicable).
Reimport Pending
Order has been deleted and will be reimported when the next integration cycle is complete.
Filtering Pick Requests
The order console allows users to filter pick requests based on a variety of factors. This allows a manager to easily see which picks were completed around a certain time, which picks have yet to be completed, and many other user-defined categories. Below is a list of all the details that can be used to filter pick requests.
Date Range
Used to filter the outbound console by a date range against the scheduled delivery date. This is controlled by a “Begin” delivery date and an “End” date. Users can set either or both to only show orders before a certain date, after a certain date, or between two dates. WithoutWire has built-in calendars that can be used to visually choose a date, which can be accessed by clicking on the calendar icon next to each field.
Route (Pick Request Group)
Filter by a certain route or group. Use the dropdown box to show only one pick request group at a time. Routes can be edited in System Maintenance > Route Maintenance.
Order Status
Users can select a status to view to help gauge the number of pick requests left in each status. If “Unassigned” is selected as the status to filter by, a user can choose which of these pick requests to assign right from the order console, without having to navigate to the Picking Assignments page. Just check the box next to each pick to assign and click on the Assign button at the bottom of the page.
Users can enter text to search by as well. The text entered can be searched by one of the following. All pick requests which contain the text in the chosen field will be selected. This allows for a user to filter by all orders that start with “ORD86” or to find all POs with the item “BNL90456.”
The following can be used with text filters:
- Order Number
- Item Number
- Customer PO Number
- Customer Number
- Customer Name
Choosing Columns
The outbound console allows the user to remove any unwanted information from the display grid. This can be done by selecting which columns to see when the console is filtered. Click on Select Columns to bring up a list of columns. Check the box next to a column to add it or remove it from view.

Console Action
The outbound console allows the user to execute four different actions from within the console itself. The user can assign orders, set routes, plan wavesets, and ship orders from the console. When the user filters on “Unassigned” orders they should see three columns appear in the console. The first column can be used to select one or multiple orders and assign them to pickers. The second column will allow the user to select one or multiple orders and assign them to a specific route. The third column will allow the user to select one or multiple orders and create a waveset order to be picked. If the user filters by orders that are “Waiting to be Picked” they will only see the first two columns. When the user filters on “Picking in Progress” they will only see the first column. To execute the final action the user would filter on the “Waiting for Shipment” status. This would allow the user to select one or multiple orders and process their shipment from the system.
Order Details
The outbound console allows users to view additional information on a separate page for each pick request by clicking the Details link in the View column of the console. The Details page contains a list of the line items and the quantities that have been ordered and picked, along with time and date stamps signifying when the user begins and finished picking each item.
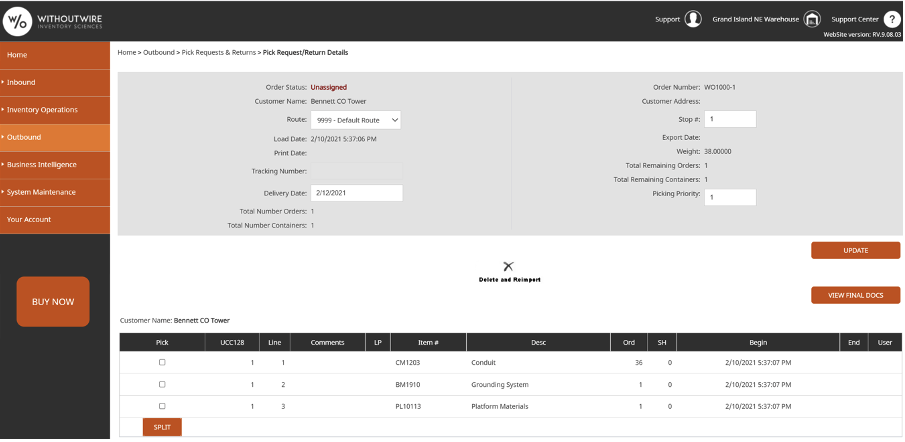
From this screen the user may also do the following:
Edit the Route Number
Edit the Stop Number
Add a Tracking Number
Edit the Delivery Date
Edit Picking Priority
View Pick Tickets
View Final Docs
Print BOL (Bill of Lading)
Add Seal Number
Add Truck Number
Delete and Re-Import (if ERP integrated) –
This allows the user to delete the pick request and if your system is ERP integrated, then the pick request will be re-imported. If you are using CSV Import/Export or API, then you control whether the pick request is re-imported or not.
Delete W/O Re-Import (if ERP integrated) –
This allows the user to delete the pick request and set the pick request to NOT reimport from the ERP system.
Close Without Export –
This allows the user to close the pick request without exporting it back to the ERP, exported to a CSV file, or calling the API to export the pick request.
Split –
This will split the item into another singular order to pick. This is helpful with large orders that require multiple pickers.